

Next you'll need a texture layer. The best way to get these texture layers is to take close up/macro photographs of a textured surface. Almost anything will work for a textured surface - wood/grass/carpet etc. This one is some old wood.

Change the texture photo to gray scale or black and white - and you can do this however you choose. This is my favorite way for quickly changing an image to black and white.

*** Don't save your image when you close it - so you don't lose your original color image.*** And this quick change doesn't allow for changes later - you're kind of stuck with these changes - which is fine for the grunge texture - but not for other images***

Drag the texture photo over the top of your color.

Stretch the texture layer to fit your color layer

Reduce the opacity of the texture layer - I moved this one to 20% so that you can see the color under the texture layer.

If you link the texture layer to the background/color layer then you won't move them while you're working with other layers (especially helpful for digital scrapbooking) To link layers - select them both in the layers pallet and then click the link button on the bottom left - see image below.

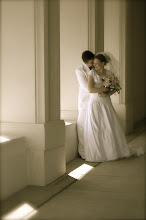
Here's the before and after image. See how the color changes?


No comments:
Post a Comment